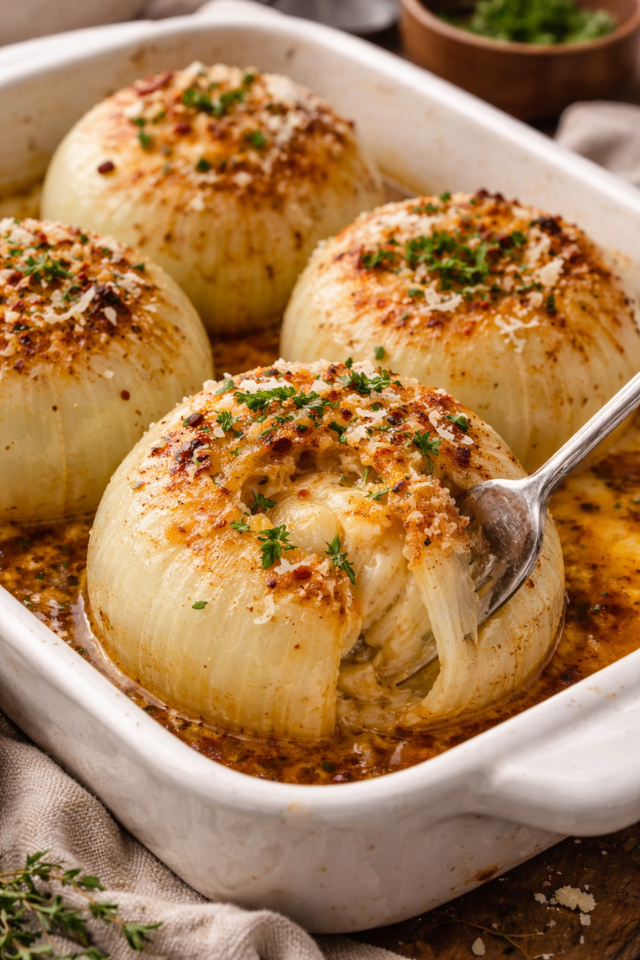
Cozy Onion boil
Looking for a easy side dish? This baked onion boil recipe is buttery, flavorful, and perfect for weeknight dinners, holiday meals, or TikTok inspired cooking. make this cozy recipe in just four simple steps!
A buttery, flavorful twist on the viral onion boil trend
There’s a reason this recipe is all over TikTok right now. It’s simple, and surprisingly good! Instead of making it feel like just another trend, this version leans into what we love most: simple ingredients, rich flavor and something that makes your kitchen smell incredible. If you’ve never had a baked onion like this before, you’re in for a cozy little surprise.
Minimal ingredients
Budget Friendly
Big flavor
Perfect side dish or snack
Fun way to try a viral recipe at home
Ingredients
2-4 sweet onions (Vidalia or yellow work best)
4 Tablespoons butter
1 Teaspoon garlic powder
1 Teaspoon paprika
Salt & Pepper
1-2 tablespoons chicken broth (or water)
Optional: Parmesan cheese, fresh herbs, red pepper flakes
Kitchen Tools I love for this
A small baking dish or oven-safe pan
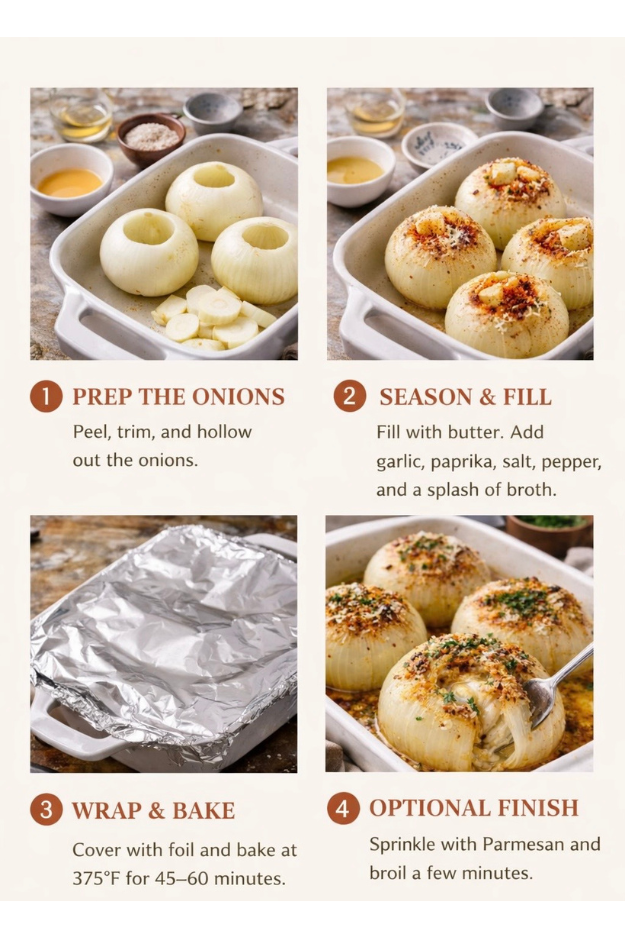
How To Make It
Preheat oven to 375 Degrees
Peel and cut the top of each onion. Use a knife or spoon to hollow out a small well in the center.
Place onions in a baking dish. Add butter into the center of each onion. Sprinkle with garlic powder, paprika, salt and pepper. Pour a little broth around and inside of each onion.
Cover tightly with foil.
Bake for 45-60 minutes, until soft and tender.
This is optional but SO good, Open foil, sprinkle parmesan cheese on top, and broil for a few minutes until golden.
Serve as a side or honestly on its own. Grab a fork and dig in!
Make it your own:
Add a splash of hot sauce for heat
Swap butter for herb butter
Top with crispy bacon bits
Add shredded cheese
“This post may contain affiliate links, which means I may earn a small commission at no extra cost to you. I only share what I truly use and love.”
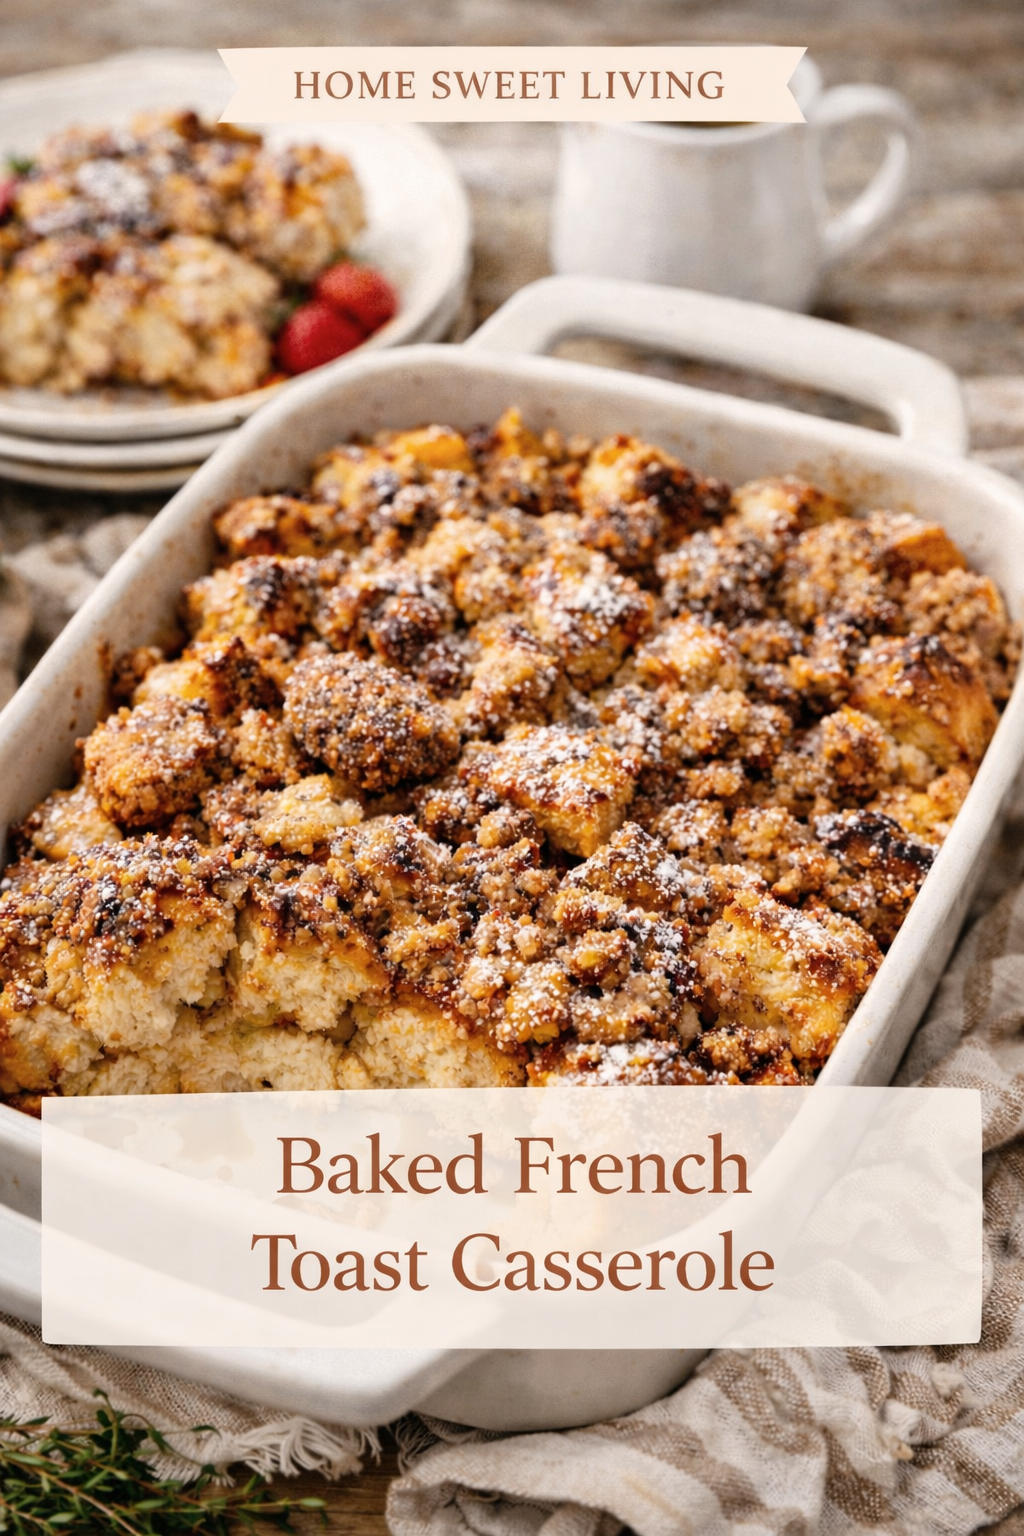
Baked french toast casserole
An easy baked French toast casserole made with simple ingredients and perfect for make ahead breakfasts, or cozy weekend mornings.
This French Toast Casserole recipe has become one of the most requested in my home. It’s simple enough for a regular weekend, a weeknight dinner, but special enough to make on holidays. The best part? You can prep it the night before and wake up to something that already feels halfway done, or prep in the morning and have it ready to bake by dinner time. Easy as that. Because it is served as a casserole, there’s minimal prep and easy clean up.
Ingredients
For the casserole:
1 loaf brioche or French bread, cut into cubes
5 large eggs
1 1/2 cups milk
1/2 cup maple syrup
1 teaspoon vanilla extract
1 teaspoon cinnamon
Pinch of salt
For the topping:
1/3 cup brown sugar
1/4 cup melted butter
Optional: chopped pecans
Kitchen Tools I Love for This Recipe
A simple ceramic baking dish that goes straight from the oven to table. This is the one i always reach for, it bakes everything so evenly, and cleans up beautifully.
A sturdy set of measuring cups and spoons. Plus, using beautiful cups and spoons just make your time in the kitchen feel easier and a lot more fun!
Lets get baking!
Preheat oven to 350 Degrees
Prepare your dish. Grease a 9X13 baking dish and spread the cubed bread evenly inside.
In a large bowl, whisk together eggs, milk, maple syrup, vanilla, cinnamon and salt.
Pour the mixture evenly over the bread, pressing gently so all of the pieces soak it up.
Add the topping. In a small bowl, mix melted butter and brown sugar (& pecans if using). Sprinkle over the top.
Bake for 40-45 minutes, until golden brown and set in the center.
Serve warm & enjoy!
Make ahead option (Highly recommend)
Assemble everything the night before, cover and refrigerate.
In the morning, just pop it in the oven and bake. No mess, no stress, just a warm, delicious breakfast waiting for you!
How i serve it at home
My family loves this served warm with:
A drizzle of maple syrup
Fresh berries on top or on the side
A drizzle of warm caramel on top (PERFECT combo if you add the pecans)
Homemade whipped cream, depending on how ambitious and sweet you wanna go!
“This post may contain affiliate links, which means I may earn a small commission at no extra cost to you. I only share what I truly use and love.”

super easy no-knead bread
This no knead bread recipe is simple, rustic and incredibly easy. Just 4 ingredients for a golden, crusty homemade loaf.
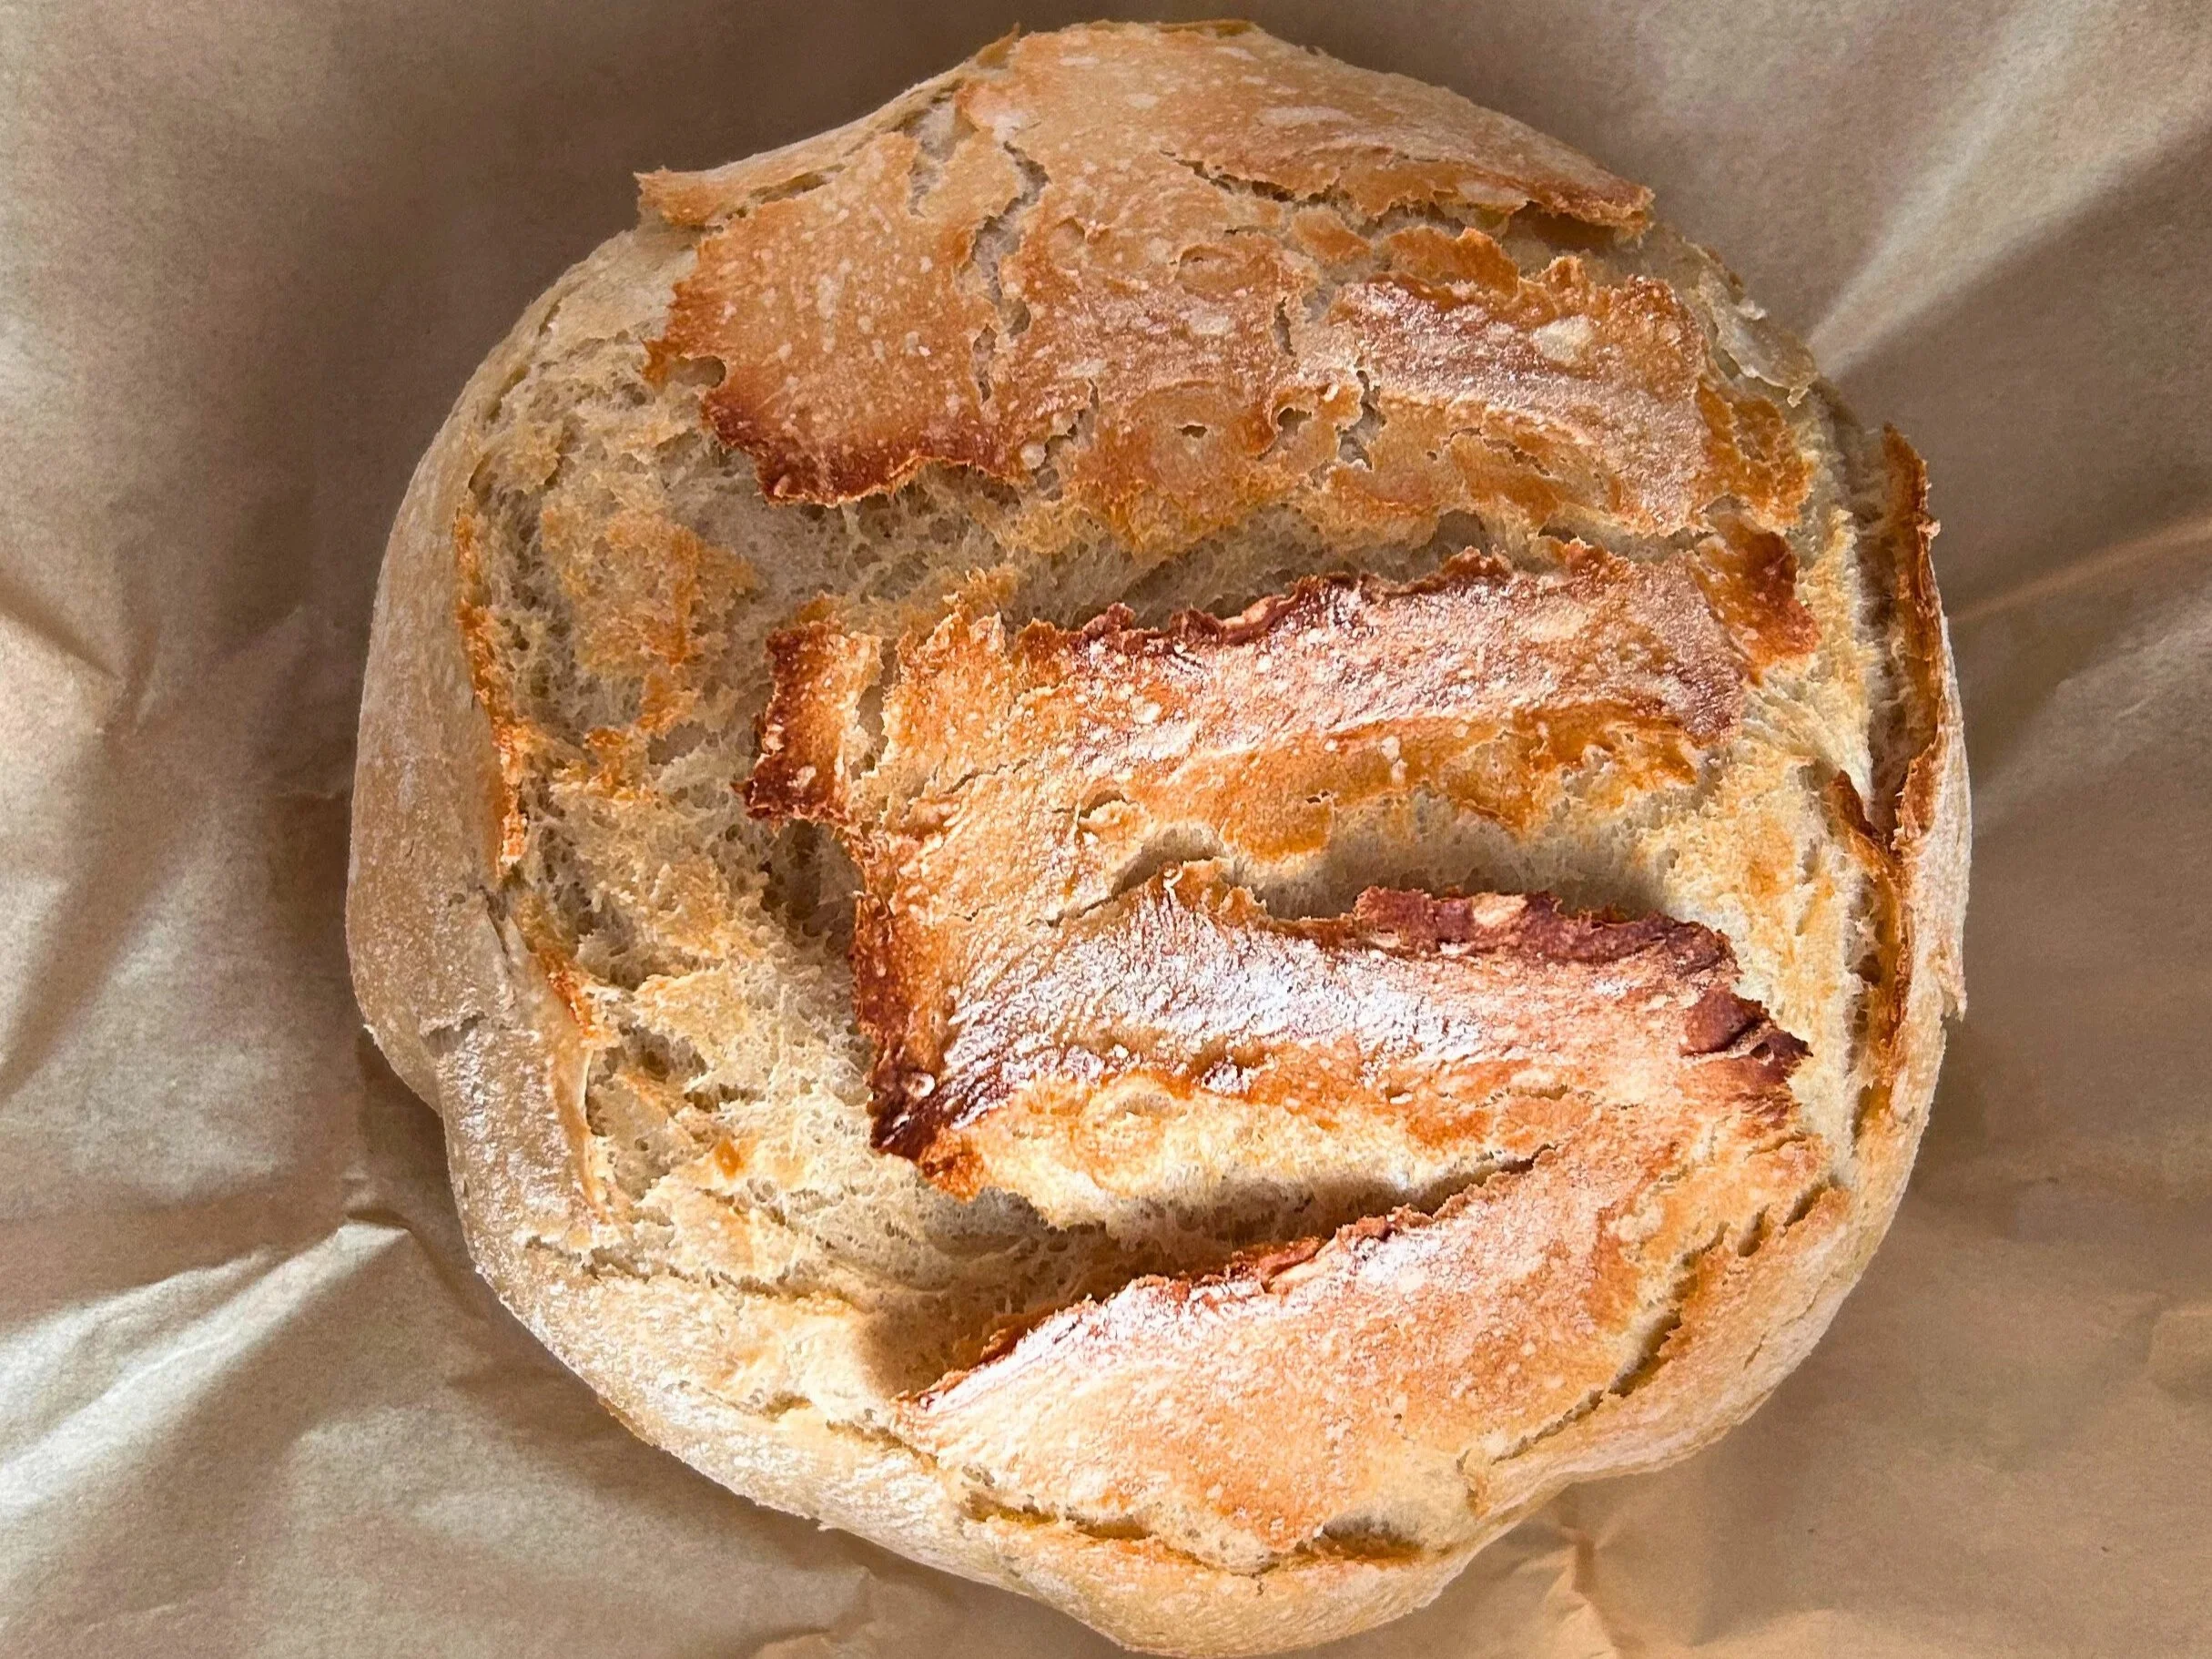
There’s something deeply comforting about homemade bread. The smell, the warmth, the taste and the pure nostalgia I feel while making it. I grew up watching my grandmother make bread loaves every weekend and eventually was taught by her. Anytime I smell the wonderful smell of bread, I immediately picture her small, wrinkly old hands (in the best way!) kneading bread dough into the most perfect loaves. While I love the entire process of how bread is made, sometimes you just don’t have time! Sourdough loaves are taking over and I love the round shape, crusty outside and the cute scoring designs on them. However, only my husband and I like sourdough and again, sometimes you just don’t have time for that. This no-knead yeast bread is kind of the best of both worlds! you get the cute round, crusty bread and you don’t have to spend as much time kneading the dough like traditional bread loaves.
This one is my go to “anyone can do it” bread recipe. No kneading, no fancy equipment, minimal ingredients and most importantly, easy! This one comes out crusty on the outside and perfectly soft on the inside. I know you will love it!
Ingredients
3 cups flour - I use all purpose, bread flour would be wonderful too
2 tsp dry active yeast
1 tsp sugar
1.5 C warm water
2 tsp salt
Dutch oven with lid
parchment paper
let’s make it
Put water, sugar and yeast in a bowl and let activate for 5 minutes.
Add flour and Salt to yeast mixture and mix until you have a tacky ball of dough
Cover with warm, damp towel and let rise for 1.5 hours
After you have let it rise, Preheat your oven to 450 degrees with your dutch oven inside the oven.
While oven is preheating, pour dough mixture onto a floured surface and stretch and fold multiple times.
After folding, tuck bread under itself to form a tight ball. It will look nice and smooth
Score the top in any design you would like. let your creative side shine!
Put in lined dutch oven (or any heavy duty vessel that has a lid)
Bake for 30 minutes with lid on. **extra tip, fill a baking dish with an inch or two of water and put on lower rack under the dutch oven. This will bring moisture while the bread is cooking and also will help prevent burnt bottoms!
Bake uncovered for an additional 12 minutes
Once done, put onto a wired rack and let cool for at least 30 minutes before cutting into it, if you can resist!

The Perfect Dutch Oven
If you’re in the market for a Dutch oven, this is the one I have and use almost daily. It’s great for soups, breads, literally anything!
This post may contain affiliate links.

Creamy Zuppa toscana soup with spinach
Creamy Zuppa Toscana made with Italian sausage, potatoes and spinach. A cozy, one - pot soup perfect for easy family dinners at home.
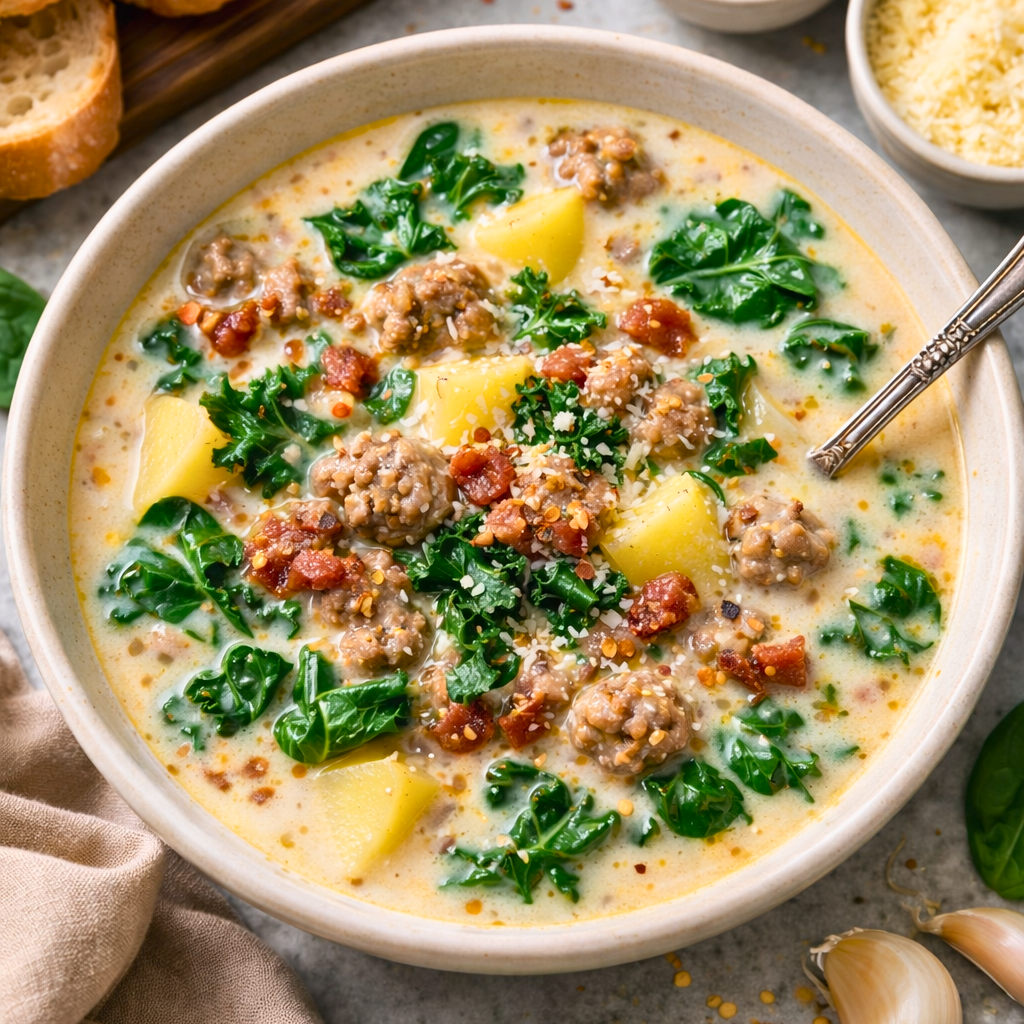
This creamy soup is one of those recipes where it instantly makes you feel like you’re wrapped in a nice warm hug! it’s made with simple ingredients that come together nicely and doesn’t take up a lot of your time. I call that a win! If you’ve ever been to Olive Garden and ordered their zuppa soup, this one is very similar. They use kale, and my family prefers spinach, so that’s what I use. It doesn’t taste as bitter and really compliments the rest of the ingredients.
This is the meal you make when the day feels long and the weather is chilly, which given the date that I’m writing this out, most of the U.S could probably use a nice warm meal. Serve this with a yummy crusty bread and a sprinkle of parmesan, and you’ve got yourself comfort food at it’s finest!
ingredients
1 lb Italian sausage - mild or hot, your choice
1/2 package of bacon - cut it right in half. Or just all of it! again, your choice! cut into bite size pieces
1 small yellow onion, diced
3 cloves garlic, minced
4 cups chicken broth
3-4 russet potatoes, diced
1 cup heavy cream
3 cups fresh baby spinach
1/2 teaspoon red pepper flakes (optional for a little heat)
salt and pepper to taste
grated parmesan cheese for serving
how to make it
In a large pot, cook the Italian sausage over medium heat until browned and crumbled. Add the chopped bacon and cook until crispy. Drain excess grease if needed, leaving a little behind for flavor. Set aside.
Stir in the diced onion into the leftover grease and cook until soft and translucent. Add the garlic and cook just until fragrant.
Pour in the chicken broth and add the potatoes. Bring to a gentle boil, then reduce heat and let simmer until the potatoes are tender.
Lower the heat and stir in the sausage, bacon and heavy cream. Season with salt, pepper and red pepper flakes if using.
Add the spinach and stir until just wilted. Taste and adjust seasonings as needed to your liking.
Spoon into bowls and top with grated parmesan cheese. This soup pairs beautifully with warm homemade bread, breadsticks, or even a simple side salad.
** This soup tastes even better the next day! Makes the perfect meal as leftovers or even sharing with a neighbor who could use a warm bowl of soup!
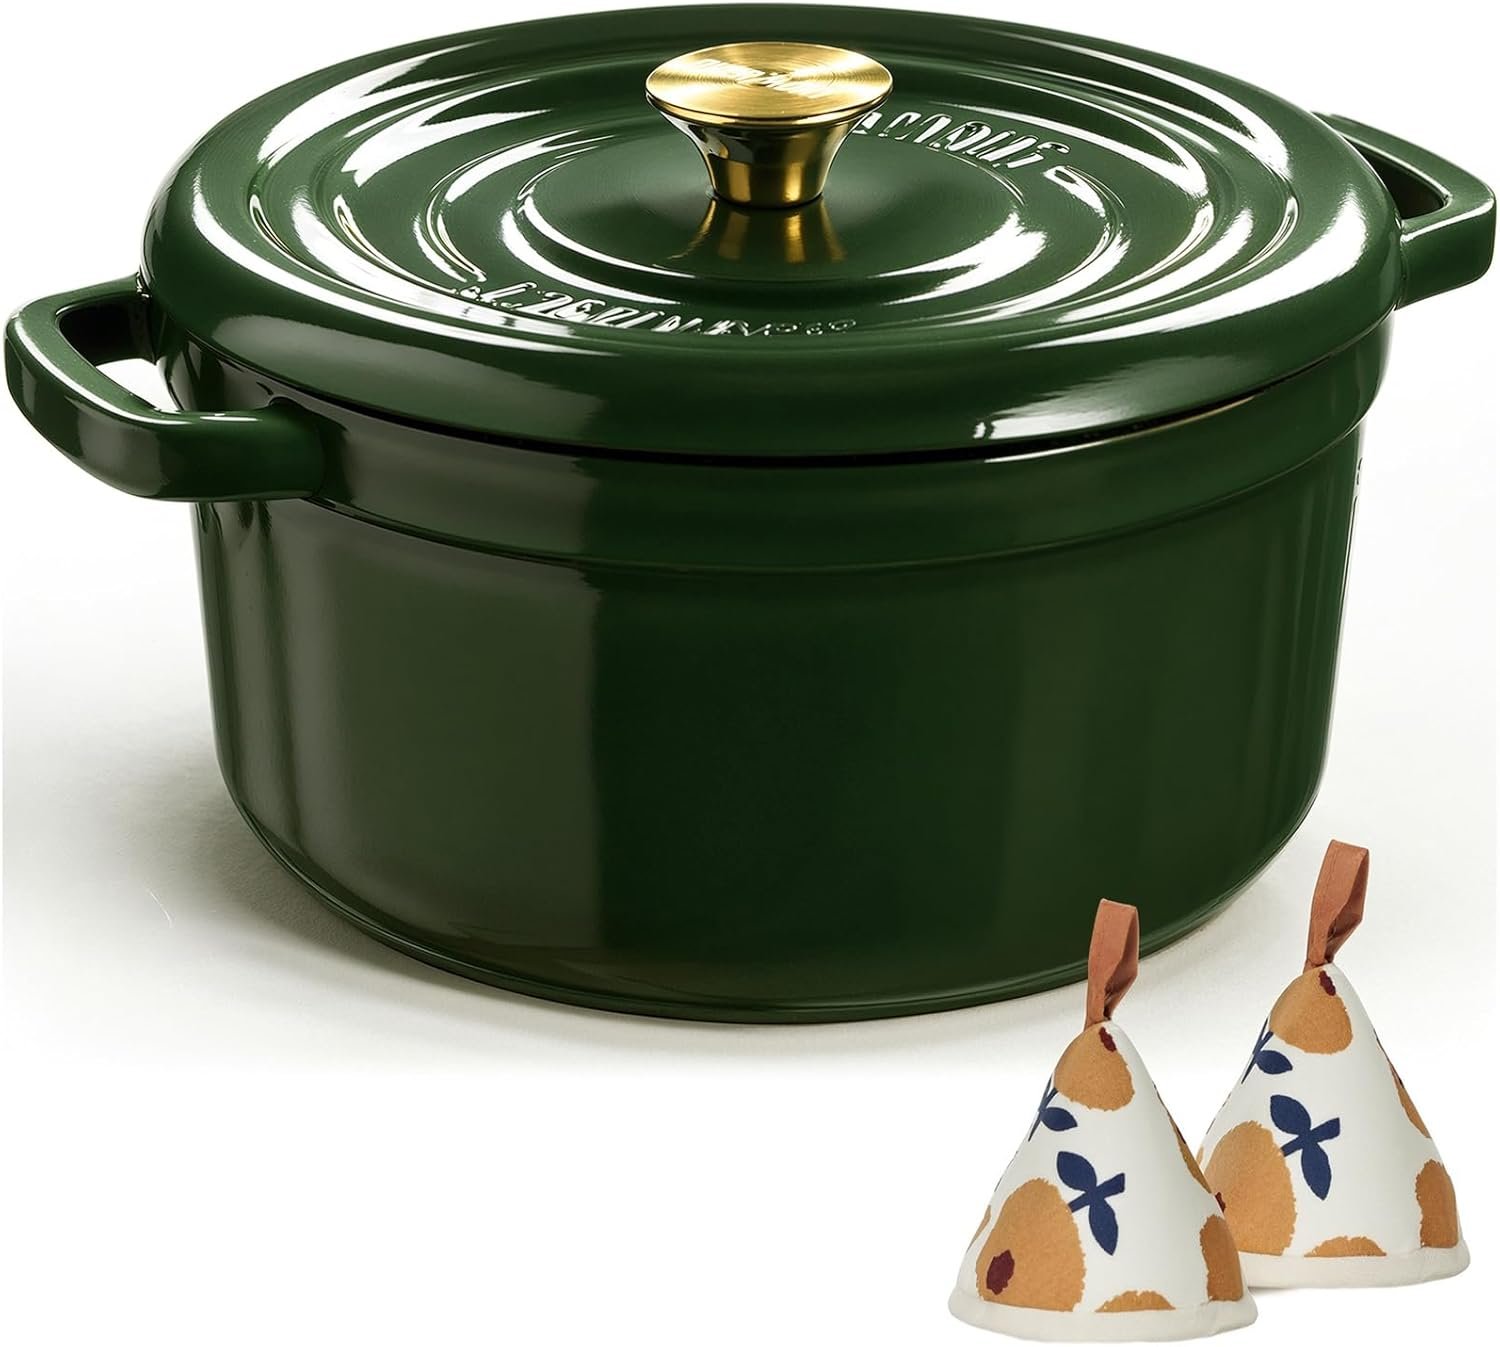
The Best Cast Iron Dutch Oven
This is the dutch oven I have and use almost daily for a variety of foods! It’s great for soups!
This post may contain affiliate links.

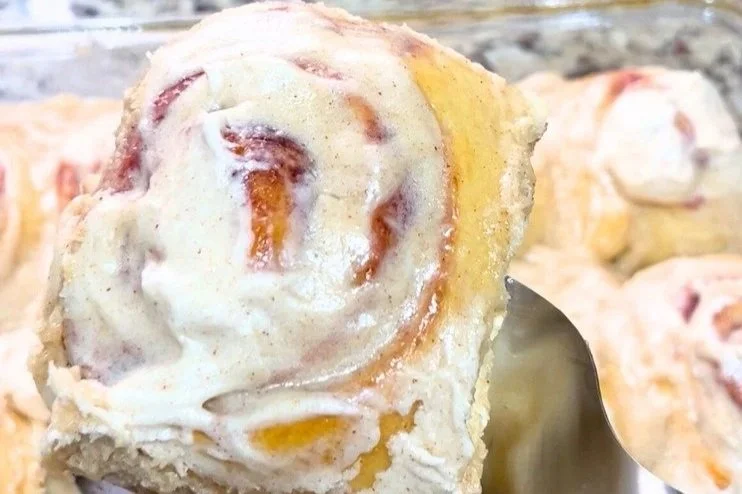
Lemon Blueberry Sweet rolls
Soft and fluffy lemon blueberry sweet rolls made with a bright blueberry filling, buttery streusel crumble, and finished with a tangy lemon glaze. Perfect for brunch, holidays or weekend baking.
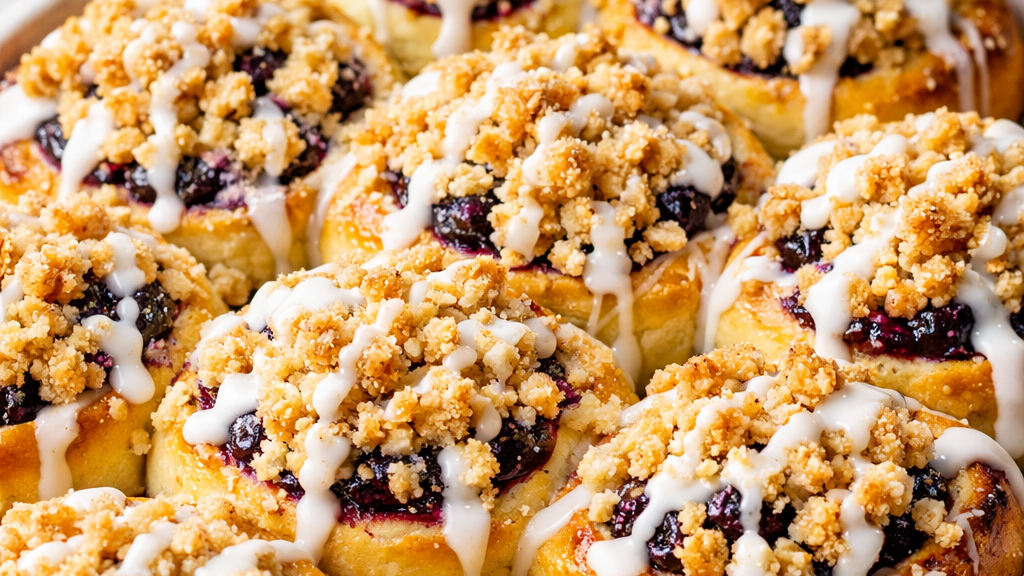
If cinnamon rolls and blueberry muffins had a sunshine filled baby, this would be it. These Lemon Blueberry sweet rolls are soft, fluffy, and swirled with a vibrant blueberry filling, then finished with a buttery streusel crumble and a drizzle of tangy lemon glaze. Yes, you read that right. Did your mouth water like mine did? These are bright without being too sweet, indulgent without being heavy and perfect for spring, summer, winter or any time you want something a little extra special.
Each bite is layered with flavor. Fresh lemon zest baked right into the dough, juicy blueberries tucked into every swirl, and the best crumble that adds just the right amount of crunch.
ingredients For Dough
3/4 C warm milk (about 110 Degrees F)
2 1/4 Tsp active dry yeast (1 packet)
1/4 C granulated sugar
1 Egg + egg yolk (room temp)
1/4 C butter, melted
3-3 1/2 C All-purpose flour
3/4 Tsp Salt
Instructions
Stir yeast + warm milk + 1 Tbsp sugar. Let bloom 5-10 minutes.
Add remaining sugar, eggs, melted butter, salt, and 3 cups flour.
Knead until soft and slightly tacky (5-7 minutes).
Cover and rise 1-1 1/2 hours until doubled.
Blueberry lemon filling
Ingredients:
1 1/2 C blueberries (Fresh or Frozen)
1/3 C sugar
1 Tbsp cornstarch
Zest of 1 lemon
1 Tbsp Lemon juice
1 Tsp Vanilla
Instructions:
Cook all ingredients over medium heat until thick and a Jam consistency (5-7 minutes)
Cool completely before spreading (IMPORTANT!)
LEMON SUGAR SPREAD
1/4 C softened butter
1/3 C Sugar
Zest of 1 lemon
Mix together until fragrant.
crumble topping
1/2 C all purpose flour
1/3 C sugar + 1/3 C brown sugar
Zest of 1/2 lemon
Pinch of salt
4 Tbsp cold butter, cubed
1 Tsp cinnamon
Instructions:
In a bowl, mix flour, sugar, lemon zest, salt and cinnamon.
Cut in cold butter using fingers or a fork until crumbly with pea-sized pieces.
Chill until ready to use
assemble
Roll dough into a 14X9 rectangle
Spread lemon sugar butter evenly
Dollop blueberry filling and gently spread
Roll tightly and slice into 10-12 rolls
Place in greased baking dish, cover and rise 30-45 minutes.
Sprinkle crumb topping over rolls, gently pressing in to the tops so it sticks.
bake
350 Degrees F for 22-26 minutes until lightly golden and fluffy
lemon glaze
Once rolls have cooled slightly but still warm, make your glaze.
1 C powdered sugar
2-3 Tbsp fresh lemon juice
1/2 Tsp vanilla
Pinch of salt
Whisk until smooth and pourable. Drizzle generously over warm rolls. I put the glaze in a bag, snipped a tiny bit of the corner and drizzled it over the rolls. It gave me more control of where it was going rather than using a spoon. That part is totally up to you and your preference!

Creamy Chicken Gnocchi Soup
Creamy chicken gnocchi soup made in one pot with tender chicken, pillowy gnocchi, and a rich, cozy broth. Better than Olive Garden and perfect for weeknights.
January has always felt like the perfect soup season. The holidays are over, it’s still cold and snowing outside, for many households unfortunately it’s sick season, you’re over the cooked ham, turkey, etc. Soup just sounds right and hits the spot every time. If you’re craving a cozy, comforting soup that tastes like it came straight from your favorite Italian restaurant, the creamy chicken gnocchi soup is for you. It’s rich, filled with flavorful chicken and potato gnocchi, and best part- it comes together in one pot. Literally perfect for a busy weeknight.
This soup is inspired by the classic Olive Garden favorite, but made from scratch with simple ingredients you probably already have. It’s ready in under 40 minutes. It’s creamy, cozy and delicious! Once you try it, it’s guaranteed to become a family favorite.
Ingredients
2 TBSP Butter
1 TBSP olive oil
1 Small onion, diced
2 Cloves garlic, minced
2 Carrots, thinly sliced
2 Celery sticks, diced
1/4 C All-purpose flour
4 C Chicken broth
1 C Whole milk or half and half
1 C Cooked, shredded chicken
1 (16 oz) package potato gnocchi
1 C Fresh spinach, chopped
1/2 TSP dried thyme
Salt and pepper to taste
Optional: A pinch of nutmeg (elevates the flavor)
Instructions
In a large pot, melt the butter and olive oil over medium heat. Add onion, carrots, and celery. Cook 5-6 minutes until softened.
Stir in the garlic and cook for 30 seconds until fragrant.
Sprinkle the flour over the vegetables and stir continuously for 1 minute.
Slowly whisk in the chicken broth until smooth. Pour in the milk or half and half, then add thyme, salt and pepper. Let simmer for 10 minutes.
Stir in the shredded chicken and gnocchi. Simmer 3-4 minutes, or until the gnocchi float to the top.
Add spinach and cook just until wilted. Taste and adjust seasonings as needed.
Tips for the best gnocchi soup
Use a rotisserie chicken to save time
Don’t overcook the gnocchi. They’re done once they float
For extra richness, use half and half instead of milk
A pinch of nutmeg really brings all the flavors together in the best way
Ways to make it your own
Add everything except gnocchi and spinach into your slow cooker. Cook on low 4-5 hours. Add gnocchi and spinach at the last 20 minutes of cook time.
Make it dairy free! Use olive oil instead of butter and full fat coconut milk or a dairy free creamer.
Add sun dried tomatoes and a sprinkle of parmesan for a Tuscan style flavor.
Serve it with garlic bread, a side salad with a fun lemon vinaigrette, or keep it classic with some homemade (or store bought) dinner rolls.
If you make this recipe, don’t forget to save it on Pinterest and share it with someone who loves cozy soups as much as you do!
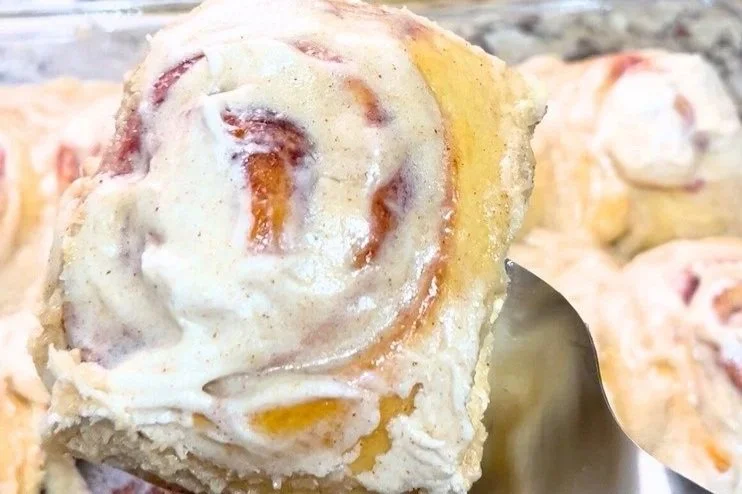
Blackberry cinnamon rolls
Soft, fluffy cinnamon rolls swirled with sweet & tart blackberry jam and finished with a rich brown butter cream cheese frosting. Nutty, tangy and perfectly balanced.
There are some recipes that feel less like work and more like fun! This cinnamon roll dough is exactly that. This is the recipe my aunt has used for years, the one she’s trusted for countless batches of dinner rolls, cinnamon rolls, breads, and sweet treats made with love and patience. When she passed it on to me, it felt like being handed a small piece of family history. Something meant to be cared for and shared, not rushed.
Every time I make these, I think about the hands that made them before mine and the memories tied to a warm kitchen and well worn recipe cards. I imagine standing in my grandmas kitchen together with my mom and her sister watching how things just somehow came to life there. I’m honored to carry this recipe forward and hope to do it justice by sharing it with you.
The blackberry filling really started out as an experiment. In the fall, my small farm town has fruit stands set up everywhere, fully stocked with incredible homemade jams and salsas made out of their fresh fruits and vegetables from the season. For Christmas my family was gifted some local, homemade blackberry jam from one of the stands. I was thrilled! however, my kids stick to the standard Strawberry and Grape. They aren’t exactly risk takers. It’s become a “tradition” of sorts to make a dessert on Sunday. I enjoy doing so for my family but to be honest, I was getting a little worn out from the classic cinnamon roll with the cinnamon filling. Always delicious, but needed something new and exciting! so, because my kids aren’t that into trying new things, I figured the only thing to do was experiment with the blackberry jam. Guess what? They loved it!
I wanted to create a roll that lingered in your memory, something familiar yet unexpected. The tartness of the blackberries tucked into that soft dough adds a depth and brightness that feels elevated, in an easy way. It’s the kind of twist that makes you pause after the first bite and think, this is different in the best way and that’s exactly what I hoped to create.
Let's get baking!
〰️
Let's get baking! 〰️
Ingredients
(Yield 8 Rolls)
1 TBSP Yeast
1 C warm water
1/8 C Sugar
1 1/2 TSP salt
1 egg
1/4 C oil
1/4 C dry milk
1 1/2- 3 C Flour
Instructions
Start by blooming your yeast. Add warm water, yeast and sugar to a bowl, whisk all together and let bloom for 5 minutes.
While yeast is proofing, combine oil, egg and salt. Whisk together and add to yeast.
Add your dry milk, mix all together.
In a stand mixer with dough attachment, combine your mixed ingredients and 1 1/2 C flour. knead for 10 minutes, if it still feels too sticky to touch, add flour 1/2 C at a time. I’ve found that with this particular recipe, there isn’t a set amount of flour that works every time. I’ve done it enough times that almost 3 cups gives you the smoothest and easiest dough to work with. There’s a lot of factors that you have to consider when working off of a recipe that was from generations ago. They probably had better quality flour or overall better ingredients that only required a small amount of flour, temperature of your home, altitude, etc. A lot of things come to play when baking anything so keep that in mind with this recipe as well.
Once your dough has come together, put it in an oiled bowl, throw a towel over it and let is rise in a warm spot for 20 minutes. *I set my oven to warm while the dough is kneading and once its warm enough, turn it off. By the time the dough is done, the oven will be just right for your dough to rise.
Once dough has doubled, punch down and roll out into a rectangle.
Jam filling mixture
3/4 C jam total for a standard 9X13 pan
Too much = bubbling out
Too little = dry centers
Thick, seedless or lightly seeded is ideal
If your jam is loose, Simmer is 5-8 minutes to reduce and cool before spreading
How to apply it (VERY important)
Roll dough out as usual
Brush a light layer of melted butter to create a moisture barrier. (I did not do this the first time and it made my dough soggy. They still baked great, it was a little messy to roll and cut)
Sprinkle cinnamon + a little brown sugar on top of butter
Spread jam in a thin, even layer, leaving a 1/2 inch border on the long edge
Roll tightly
Cut 2 inches wide to make 8 big rolls.
Place in a greased pan
Let rise again for 15 minutes
Preheat oven to 350 Degrees
Bake 25-30 minutes until they are golden brown on top
Let cool until just warm and spread your favorite frosting on top.
*My brown butter cream cheese frosting recipe is to die for on top of these. The frosting and blackberry flavors combine beautifully and even out the tart and sweetness of both. You can find the recipe in my frosting section. You won’t regret it!

Brown Butter cream cheese frosting
Nutty brown butter, tangy cream cheese, and just the right amount of sweetness. This frosting turn any dessert into something truly special.
Have you ever smelled the rich, warm, nutty scent of browned butter that fills your kitchen and somehow makes everything feel more special? if not, you’re missing out but not to worry- you’re at the right place. This brown butter cream cheese frosting is rich, smooth, and just the right balance of tangy and sweet, with a depth of flavor that takes your classic cream cheese frosting to a whole new level.
I love this frosting for moments when you want your baked goods to feel bakery-worthy but still comforting and homemade. It’s perfect for topping your fresh warm homemade cinnamon rolls, layered onto a carrot cake or paired with fruity fillings like blackberry or raspberry jam. The browned butter adds a subtle caramelized note that makes every bite feel cozy and indulgent without being overly sweet.
If you’re looking for a frosting that’s simple to make, unforgettable in flavor and guaranteed to have people asking for the recipe, this one is for you!
Let’s get to it.
Ingredients
1/2 cup butter, salted.
4 oz cream cheese, softened
1 1/2 - 2 cups powdered sugar (adjust to your level of sweet you’re looking for)
1 tsp vanilla extract
1 - 2 tbsp heavy cream or milk (as needed)
Instructions
Melt butter over medium heat, stirring constantly. It will foam, then turn golden with brown specks and smells nutty. Remove from heat immediately. Let cool until just warm about 10 to 15 minutes.
While that’s cooling, beat your cream cheese in a bowl until smooth and fluffy.
Add your brown butter slowly in to your cream cheese while it’s beating. Scrape bowl and beat until fully incorporated and silky.
Add your powdered sugar, starting with 1 1/2 cups. This is where I stop, but if you like a more sweet frosting, add up to 2 cups. It should stay slightly tangy. Beat until smooth.
Mix in vanilla and add your cream 1 tablespoon at a time until it’s spreadable and luscious.
Helpful tips:
*I use salted butter and don’t add anymore to the recipe. If you choose to use unsalted, add a 1/4 tsp salt.
*I use a stand mixer with the whisk attachment. A hand mixer works just as great!

Vanilla Bean Buttercream
Indulge in the creamy, dreamy perfection of our homemade vanilla bean frosting. Whipped to silky smoothness with real vanilla bean specks, it’s the ultimate sweet finishing touch for cakes, cupcakes, and cookies. Light, fluffy, and full of rich vanilla flavor, this frosting is pure comfort in every bite.
If you’ve ever dreamed of frosting that’s silky, creamy and packed with real vanilla flavor, but without all the extra sugar, this is about to become your new favorite! Frosting can either make or break a dessert. I love a soft sugar cookie (see my post for an easy recipe) but sometimes the frosting is way too sweet and takes away from the flavor of a cookie. I really wanted to find a way to keep the vanilla creamy taste but make it with the right amount of sweet. I have narrowed down that perfect middle and now it’s time to share. Using vanilla bean paste (or fresh) for that rich, aromatic flavor, this frosting hits all the right places. Perfect for cakes, cupcakes and sugar cookies. It’s proof you don’t need heaps of sugar to enjoy a luxuriously smooth, melt in your mouth frosting.
Light Vanilla Bean Buttercream
(Reduced Sugar)
Soft & Airy
Just-sweet (not overpowering)
Pipes and spreads beautifully
INGREDIENTS
1 C unsalted butter, Softened
1-1 1/4 Cups powdered sugar, sifted (start with 1 C and taste for the amount of sweet you’re looking for)
2-3 Tbsp heavy cream (or milk)
1 Tsp vanilla bean paste (or seeds from 1/2 vanilla bean)
1/4 tsp vanilla extract
Pinch of salt (essential for balancing out the sweet)
INSTRUCTIONS
Beat butter on medium-high 3-4 minutes until very pale and fluffy
Add powdered sugar 1/2 C at a time, mixing well and tasting as you go
Add vanilla bean paste, extract and salt
Beat in heavy cream 1 Tbsp at a time until light and spreadable
Whip on high 1-2 minutes for extra airiness
TIPS
Use real butter, not shortening
Whip longer than usual to incorporate air
stop adding sugar once it tastes balanced and to the sweetness you desire
Salt is key. It rounds the sweetness
STORAGE
Room temp: 1 day
Refrigerated: 5 days (re-whip before using)
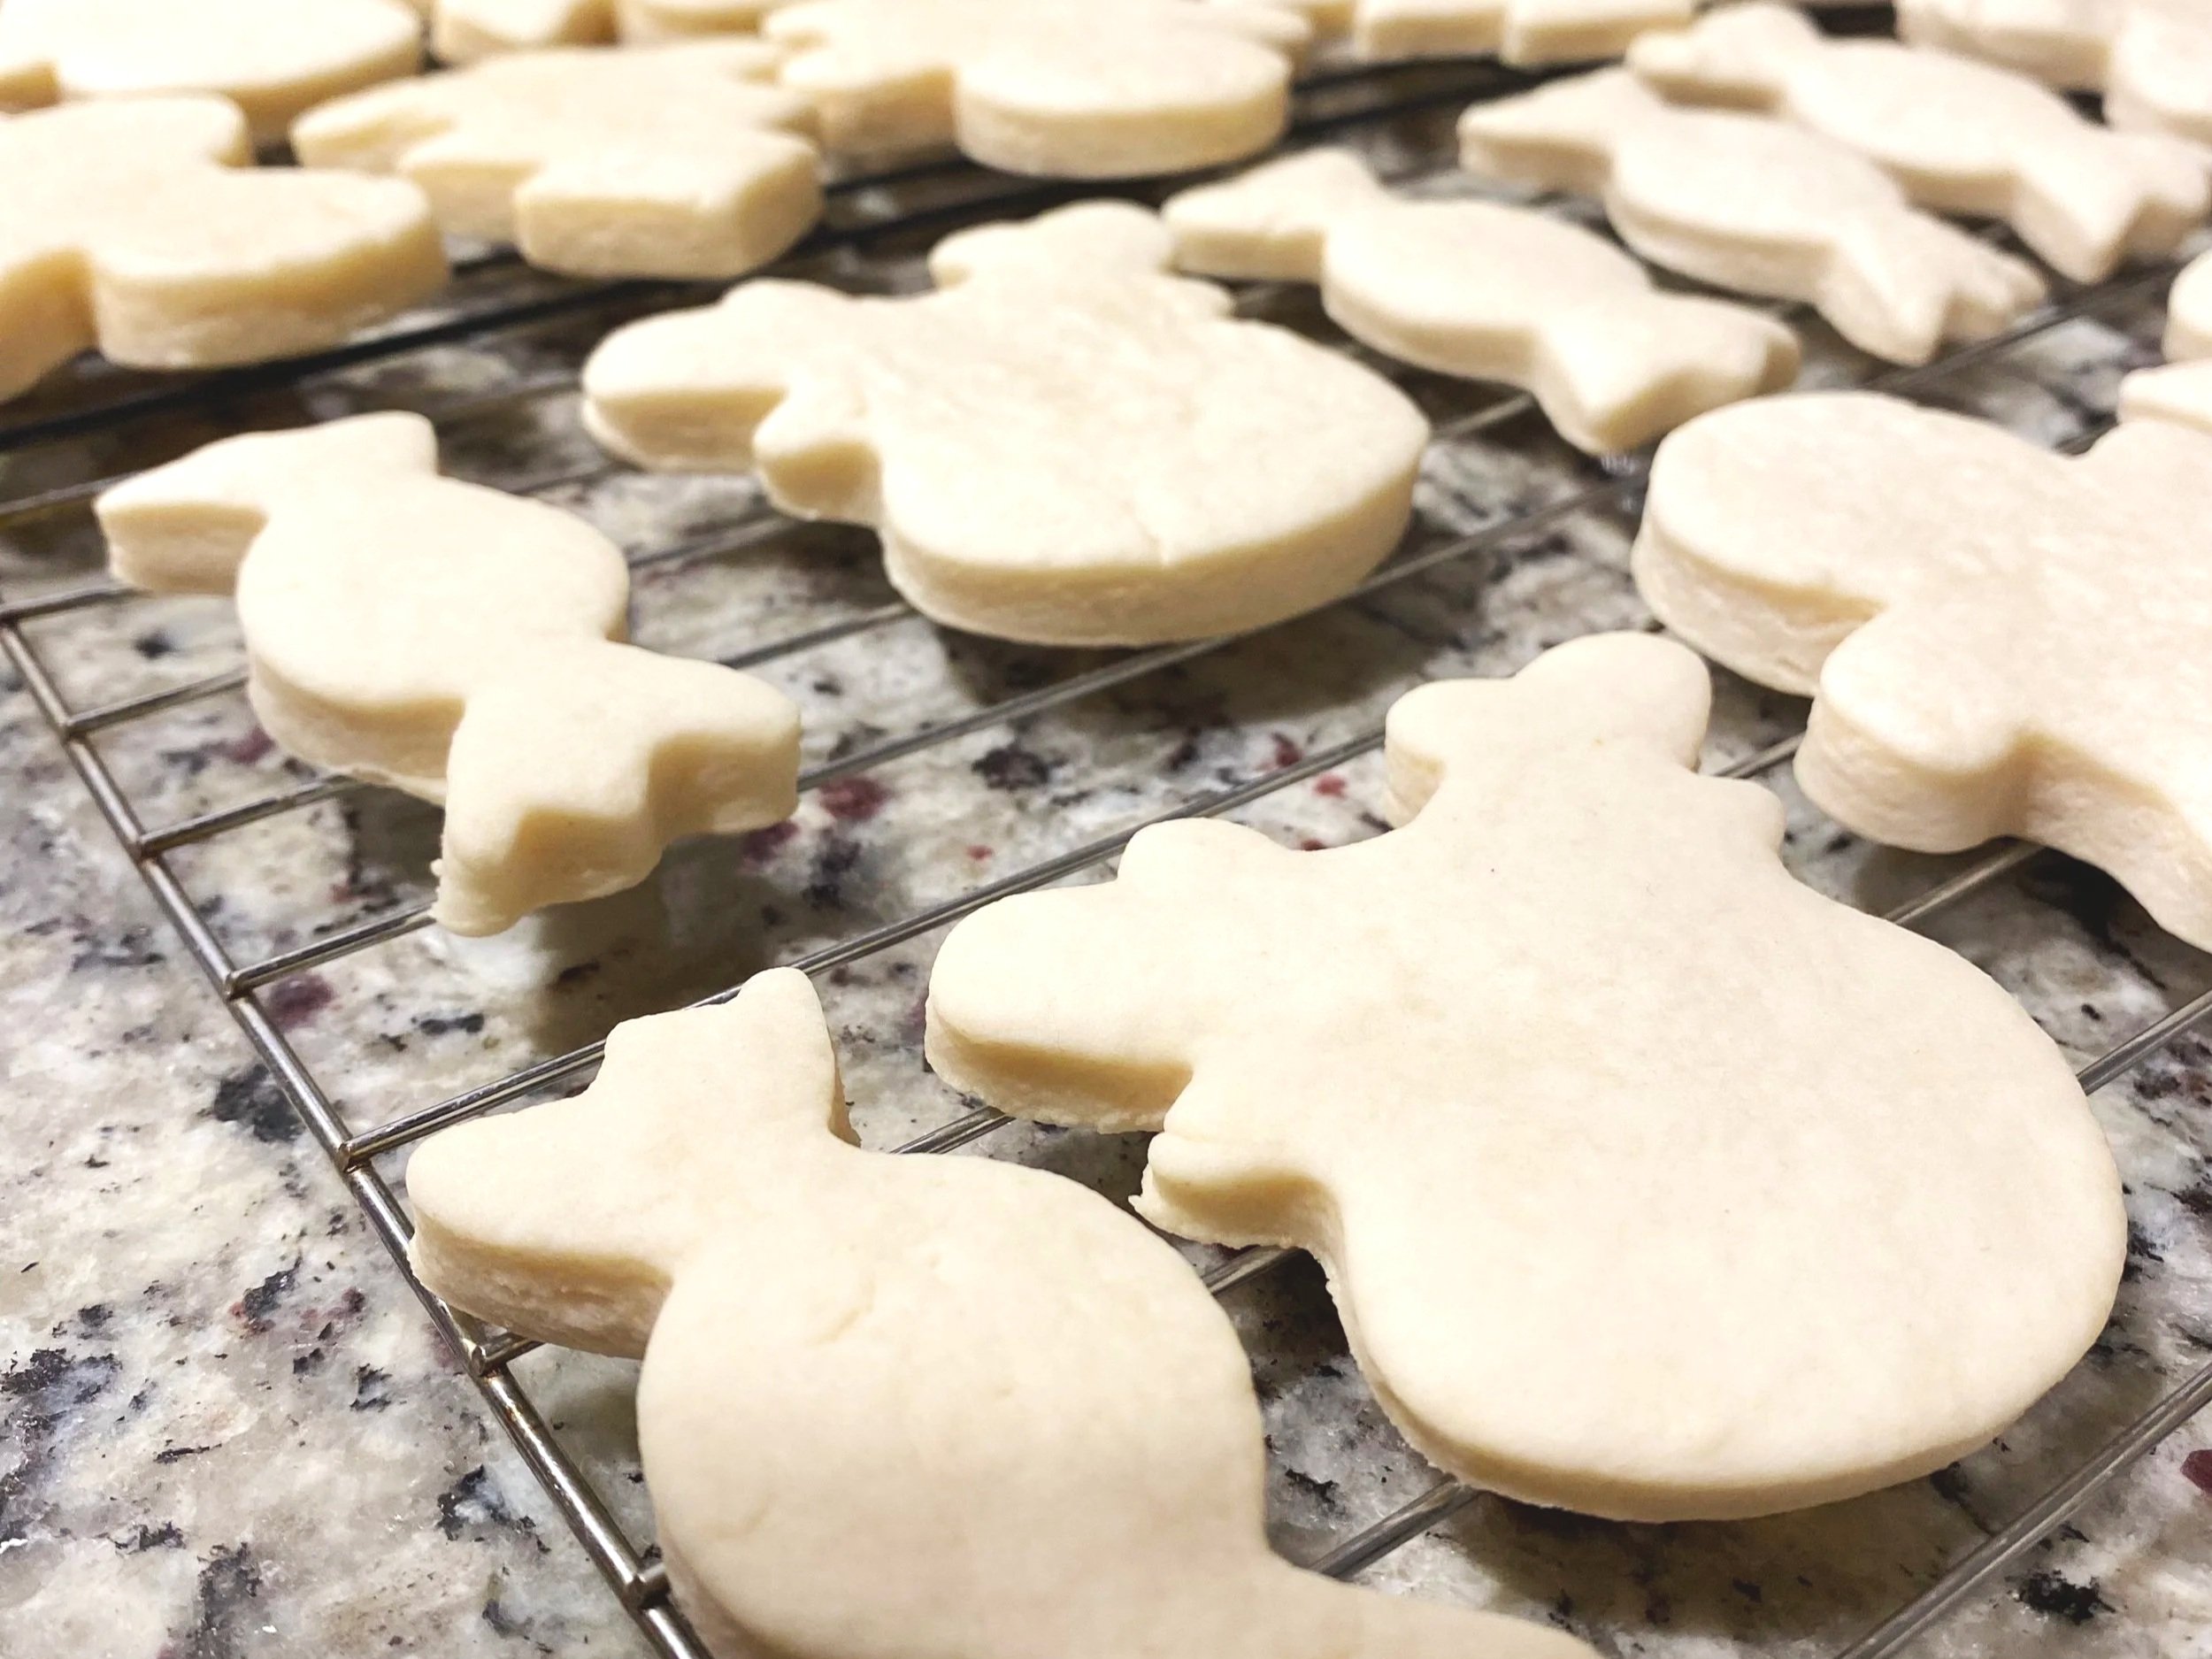
Soft & Chewy cut out sugar cookies
Soft, buttery sugar cookies that hold their shape and stay perfectly chewy. These classic cut-out sugar cookies are easy to make, simple to decorate, and loved by everyone! Perfect for holidays, birthdays or anytime baking feels like home.
There’s something truly special about a soft, chewy sugar cookie. It may be unpopular opinion but when it comes to sugar cookies, unless they’re soft to bite into, I will not eat them. Especially when it’s rolled out, cut into sweet little shapes and then having your kids color them in homemade frosting. You want them soft, trust me. These are my go-to, tried and true whenever I want a cookie that’s just as fun to decorate as it is to eat. They hold their shape beautifully, stay pillowy soft for days, and have that classic buttery vanilla flavor that feels like home.
Whether you’re baking for holidays, birthdays or just want a treat in the afternoon, this recipe is simple, reliable and made to be shared. Grab your favorite cookie cutters, preheat the oven, and let’s make sugar cookies that are soft, chewy, and absolutely delicious!
Soft & Chewy Cut-Out Sugar Cookies
Yield: 24-30 cookies (depending on size)
INGREDIENTS
3/4 C Unsalted Butter (Softened)
2 OZ Cream Cheese (Softened)
1 C Powdered Sugar
1 Large Egg
1 1/2 Tsp Vanilla extract
2 3/4 C All-Purpose Flour
1 Tsp Baking Powder
1/4 Tsp Salt
INSTRUCTIONS
Cream butter + cream cheese until smooth and fluffy (2-3 Minutes)
Add powdered sugar and mix until light
Beat in egg and vanilla
In a separate bowl, whisk flour, baking powder, and salt
Slowly mid dry ingredients into wet until just combined
Chill dough for 1 hour (Important for clean cut outs)
Preheat oven to 350 degrees F (175 degrees C)
Roll dough to 1/4 inch thickness on a lightly floured surface
Cut shapes and place on parchment lined baking sheets
Bake 8-10 minutes until edges are set and centers are pale and soft (do NOT brown) they will look underbaked but trust that they are done. They’ll finish setting as they cool.
Cool on pan for 5 minutes, then transfer to cooling rack.
Cool completely before decorating
If you want a delicious, light and gently sweet homemade frosting, look for my Vanilla Bean Buttercream blog post. I promise you will love it!

Welcome
Welcome to Home Sweet living. A cozy blog for homemakers and home lovers! Discover simple recipes, baking tips and slow- living ideas inspired by homemade traditions that make every home warm and welcoming.
Hello, I’m Jessica and I’m so glad you’re here.
Home Sweet Living was created from a deep love for home and family. Around here, home isn’t about being perfect. It’s about embracing the messy. I’m a wife and mom to four incredible kids. I have a busy, loud and love filled household where life rarely slows down. I’m learning how important it is to create pockets of peace right where we are.
My love for baking and homemaking began long before I became a wife and mother. My childhood was spent going to my grandmothers house on the weekends. She believed in using what you already had, teaching me how to can fruits and vegetables, bake breads from scratch and turn simple pantry ingredients into something special. She showed me that recipes don’t have to be complicated to taste like a five star chef made it. Sometimes all you need is time to slow down and have a simple joy in what you’re creating. Beyond the kitchen, she taught me how to sew quilts, crochet and create with my hands. Instilling in me a deep appreciation for a slower, more intentional way of living. That homemade love shaped me into who I am and it’s the heart behind everything I share here. From comforting recipes that I believe anyone can make, to the every day rhythms of home with 4 children that make everyday life feel chaotic at times but so full.
I started this blog because I wanted to share the things that make our home, us. Simple recipes, routines that work and some that don’t, honest feelings and little random touches that make life feel sweeter. This space is about growth, learning as I go, letting go of perfectionism and choosing hope when life feels heavy. Home Sweet Living is where real life means slowing down, a place to gather and feel less alone.
Whether you’re here for a recipe, a bit of encouragement, or simply a quiet moment in your day, I hope you’ll feel welcome. I hope something here inspires you to make your own home feel a little more like home sweet home.
-Jess